Saturday, December 28, 2019

REVIEW: Skylum Luminar 4– FINALLY Complex Sky Replacement Without Cumbersome Masks!

I’ve been following Skylum Software since its MacPhun days and along the way they have made many products that I’d put into the camp of “good, but still not there yet”. Luminar is definitely one of those products that has a lot of great photo editing features, but it’s always lacked my beloved U-Point controls in the Nik Collection (now by DxO). This is important because often times you want to make local edits to specific features of your photo, but not globally across the entire photo. While Photoshop and Luminar offer masks to help with this, they are cumbersome to create especially along the edges of the mask against complex subjects like tree branches with leaves or hair.

Luminar 4 addresses this with what it is calling Artificial Intelligence masking and it nothing demonstrates this better than its new sky replacement feature. While this isn’t far from the only new feature in Luminar 4, it’s the one that is worth talking about first as this really is breakthrough technology that makes me excited for Luminar now and in the future.

Here’s an example of a photo of a beautiful valley in Switzerland that I took this last October. This unedited version isn’t bad, but it’s a little hazy and lacks the impact of what it felt like when I saw it in real life:


Original

To address this, I used the AI Enhance feature with an auto generated luminosity mask with the AI Accent light filter to enhance the details and overall color of the image. I then used the Color and Details Enhancer filters to make the image feel a bit more crisp. Lastly, I used the Landscape Enhancer to Dehaze and boost the foliage a bit. This set me up for what I think is one of the biggest improvements – the AI Sky Replacement – where I used the Blue Sky 4 preset for a subtle but believable improvement:


Edited with Luminar 4 and Blue Sky 4

In less than a minute I got improvements that were good enough for me to call this one done. However, I like to tinker so I kept experimenting with skies. My wife was watching me do this and she encouraged me to use the Blue Sky 6 preset for leading lines that pull your eyes into the mountains:


Edited with Luminar 4 and Blue Sky 6

Changes like these are subjective so I polled my Facebook friends and most found Blue Sky 6 to be the best choice, while some aligned with me found Blue Sky 4 to be more believable.

In retrospect, I think both are believable if you don’t know of the original image. What’s more, it’s feasible for this scene to have clouds of this nature, so I don’t consider this to be a change that misrepresents the area – it just misrepresents my luck with the clouds this day.

What’s more, my sensor was as dirty as hell due to changing lenses in the wind so I lucked out and got about a hundred dust spots in the sky removed when I replaced the sky – without any effort on my part. I’ve seen Luminar 4 fans getting the same benefit by using sky replacement on power lines and other distractions in the sky. This s a huge time saver, and I find it quite believable – especially with the wealth of adjustments you can make to this filter:

So yes, I can easily say that this feature is a hit and delivers a huge value in your digital workflow making this a no-brainer investment or upgrade if you do outdoor photography.

Yeah, but what about…

Using your own sky photos? Yes, you can.

Complex backgrounds with only one click? Yep, no problem as shown here:


Blue Sky 4 with Complex Tree Branches

Click here for unedited original

Now this horribly bad looking photo isn’t believable as we’ve put a bright blue sky into an overcast day, so there’s still work to do. However, I wanted to illustrate the power of the AI masking (which is more easily appreciated with darker sky colors) so I had to include it.

What about people?

Here’s a photo I took in 2015 for my RX100 IV review that I never bothered to edit because it would have been too much work to mask around Kai’s hair. With the AI Face Enhancer, AI Sky Replacement and a few other minor adjustments I got a much improved image with about a minute of editing:

2015 RX100 IV Photo with Portrait Enhancements & Sky Replacements

Take note that I’m using the Blue Sky 4 preset in three images in this article, but the sky is different for all of them – this because this isn’t a simple image substitution but an AI application of the sky that keeps the horizon in mind. In this case it did miss a spot in the bottom left corner, so it’s not quite perfect – but it’s still pretty damn good. As I show in my video below, problems like this sometimes are easily solved by adjusting the horizon in this filter. However, this one can’t be corrected this way.

In this case, I like how the leading lines of the clouds all draw you into Kais’ face. However, you have to be careful about default processing choices because it’s easy to get dark skies like this. To address this problem be sure to experiment with the Sky Exposure setting as well as making sure that AI Sky Enhancer is 0 in the AI Enhance Essential filter.


Above with Sky Exposure set to 100 and Red saturation = -8

I also use the AI Face Enhancer remove skin flaws, enhanced lips & whitened teeth (both exaggerated for effect), pulled his jaw line in and more without me doing any face masks or object mapping. It just works with no hassle and that’s huge!

Video Tutorial

To demonstrate a lot of concepts in Luminar 4, I chose this image that I thought would be the ultimate test:


Video Tutorial Image BEFORE Edits

It features a lot of blown out background, thin strands of hair, and a face that is turned away from the camera.

Notice even when I zoom in, the auto masking around the hair is nothing short of spectacular:

Auto detection of the sky and face make this difficult edit easy

If you have 10 minutes to spare, you can see how I edited this image using Luminar 4:

Conclusion

While I do think the Windows version is unacceptably slow at times on my desktop computer, it’s still usable. I’m also still a fan of Lightroom, so I don’t want Luminar to be my digital asset manager so I find having to open photos using Edit Single Image and close them by right click remove to be unnecessarily cumbersome.

With these gripes aside, this is an impressive piece of software that does appear to be doing some advanced image analysis with AI above and beyond anything I’ve used to date. This alone makes it worth a look to help speed up your digital workflow. As such, I can highly recommend this product and I look forward to great improvements to come in the future.

Where to Buy?

CLICK HERE to learn more or buy today.

Other articles you may enjoy

If you enjoyed this article, you may also enjoy these:

Enjoy these and more on the Reviews tab as well as Ron's Recommendations.

Disclosure

If you make a purchase using links found in this article, I may make a commission. It doesn’t cost you a penny more, but it does help to support future articles like this.

NOTE: This site requires cookies and uses affiliate linking to sites that use cookies.

If you enjoyed this article, please support future articles like this by making a donation or saving money by using my discount coupon codes. Either way, your support is greatly appreciated!

This blog is intended for freelance writing and sharing of opinions and is not a representative of any of the companies whose links are provided on this site.

The opinions provided are of Ron Martinsen alone and do not reflect the view of any other entity

Friday, December 27, 2019

REVIEW: Fujifilm X-T30 with 18-55mm & XF 100-400mm Lens


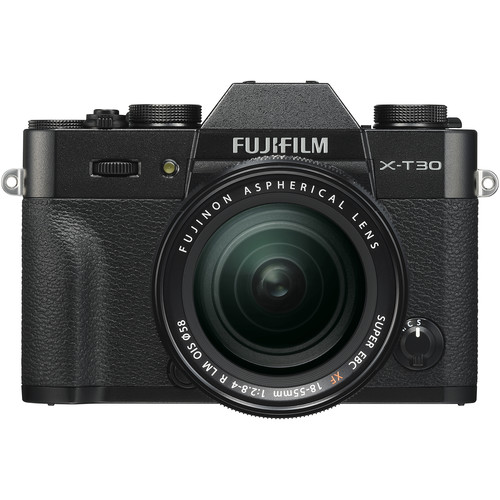
FUJIFILM X-T30 Mirrorless Digital Camera with 18-55mm Lens at B&H
FUJIFILM X-T30 Mirrorless Digital Camera with 18-55mm Lens

This summer I got to spend some quality time using the Fujifilm X-T30, and like always I can’t help but fall in love with Fujifilm’s brilliant in-camera color processing. However, the latest smart phones are getting “good enough” for most users needs, so would this camera wow me like the Fujifilm GFX 50s  or would it be another disappointment like the Canon EOS R?

Overall Thoughts

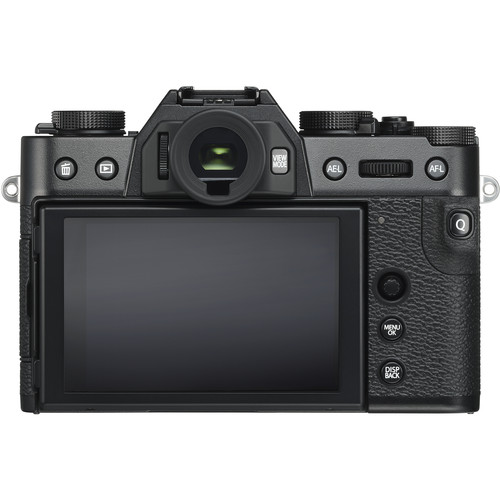
Rear View of the Fujifilm X-T30
The joystick is a departure from the traditional d-pad design found on other Fujifilm cameras, but I find it more user-friend and reliable

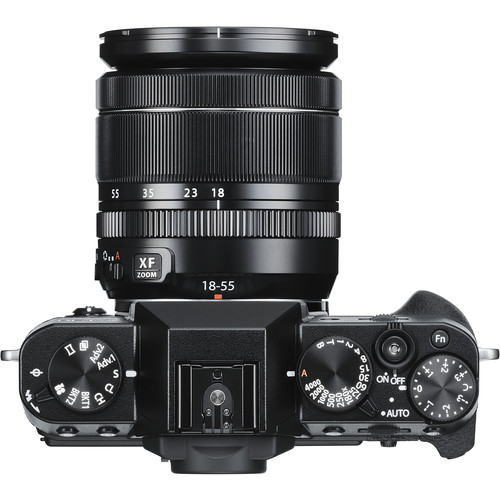
Generally speaking, Fujifilm is one of my favorite brand of camera bodies to use because of the ease of use of the physical knobs for aperture, shutter speed, drive mode and exposure compensation. This allows you to quickly switch between manual settings or auto for your creative controls without distracting you from the creative process of finding your desired composition for a given shot.

Top View of the Fujifilm X-T30

While I won’t bore you with all of the specs that can easily be read at B&H or elsewhere, I’ll say that the burst mode of up to 20 fps at 26.1 MP for up to 17 Exposures is more suited for casual use (vs a machine gun like the Sony a9 or Canon 1DX Mark II).  However, roughly $899 (body only as of Sept 2019) price of this camera is a lot cheaper so this camera is clearly targeting the value shopper looking for more creative control over the best smartphones.

I wasn’t blown away with the sensor quality of this camera, but those looking to enjoy images on large 4k displays or in print will see the advantage of this sensor over their smart phone images – at least I do compared to my iPhone XS.

The battery life and overall ease of use – for someone who is going to do more than stay in full auto mode – was great. My only complaint was that the touch screen got tapped by my nose quite often when I had my eye up to the the viewfinder which caused the focus point to be reset. That irritated me enough that I had to turn that feature off.

Features like eye tracking AF (with a choice between left, right and auto eye) are sure to please, and the gorgeous in-camera color of the in-camera processing of JPEG’s is sure to please the photographer who has no desire to do post-processing. Those who enjoy black and white photography are sure to be pleased with the built-in black and white presets as well.

Real World Shots

Like many of my reviews, I simply carried this camera during my life adventures with my family where I rarely have more than a minute to spend on a shot before I have to move on. None of these photos are staged – they are simply taken with most of the camera default settings except I’ll sometimes do exposure compensation or set the white balance, aperture or shutter speed to suit the scene. As such, I consider these typical shots that anyone can get and with additional effort much greater results are possible.

The photos shown below and in the gallery are the original in-camera JPEG’s with zero post-processing including no rotating or cropping, so what you see is what you can expect to get.

Here’s my thoughts about the results I got on a few select photos:


f/5 @ 55mm for 1/680 sec at ISO 160

Fujifilm’s strength is great natural colors with the default settings


f/2.8 @ 55mm for 1/340 sec at ISO 320

Eye focus wasn’t bothered by this hair so a spur of the moment snapshot turned out ok


f/10 @ 24mm for 1/200 sec at ISO 320

While f/10 turned out great…


f/16 @ 24mm for 1/75 sec at ISO 320

…Fujifilm X series seem to not be as heavily impacted by diffraction or being stopped down to large f-stop numbers as other brands


f/11 @ 41mm for 1/60 sec at ISO 320

Click to view full screen to appreciate the detail and beauty not possible with even the best smart phones


f/5 @ 107mm for 1/180 sec at ISO 160

The XF 100-400mm f/4.5-5.6 R LM OIS WR Lens was a nice step up from the kit lens…


f/5.6 @ 400mm for 1/500 sec at ISO 400

especially when at 400mm to see the picture within the picture (from the above scene)


f/4.5 @ 100mm for 1/400 sec at ISO 320

This sunset shot taken with the 100-400mm was one of my favorites as the in-camera processing captured a true to life image of just how awesome this sunset light was on this tree


f/8 @ 16mm for 1/420 sec at ISO 320

This was a beautiful scene, no doubt…


f/8 @ 16mm for 1/350 sec at ISO 160

…but being able to get an in-camera panorama of it made me feel like I was really there


f/5.6 @ 400mm for 1/900 sec at ISO 320

Nobody does great colors better than Fujifilm – period


f/5 @ 261mm for 1/850 sec at ISO 160

The full series of burst mode shots are in the gallery, but I must say I was very unimpressed with the image quality and auto focus performance of the 100-400 on this camera body


f/8 @ 17mm for 1/420 sec at ISO 200

Dynamic range was meh – I’ve definitely seen worse, but I’ve also seen a lot better – especially on the iPhone XS – but the color is definitely better on the X-T30


f/5.6 @ 16mm for 1/950 sec at ISO 200

Again, another no editing required result from the Fujifilm


f/11 @ 23mm for 1/75 sec at ISO 250

This was an amazing scene, but it also shows how great the in-camera HDR is on the iPhone XS which is frustrating when buying a a camera like this


f/5.6 @ 26mm for 1/250 sec at ISO 200

Still there were plenty of pixels and detail to satisfy me for many of my shots


f/8 @ 17mm for 1/420 sec at ISO 200

The articulating LCD made it much easier to get action shots of my daughter – something that would be nearly impossible with a smart phone


f/5.6 @ 31mm for 1/680 sec at ISO 200

Real bokeh vs fake iPhone bokeh (portrait mode) is always more enjoyable too


f/5.6 @ 16mm for 1/950 sec at ISO 200

I was impressed with the shadow details and the ability to focus on the eye of this Canadian Goose


f/8 @ 17mm for 1/240 sec at ISO 200

While a ColorChecker Passport would probably say that the colors are exaggerated, this camera captures scenes like this exactly the way the way my minds eye remembers them


f/5.6 @ 19mm for 1/750 sec at ISO 200

The kit zoom offers the ability to go wide as in the case with the beach scene here…


f/5.6 @ 53mm for 1/800 sec at ISO 200

…but still zoom in enough to bring you into the action


f/5.6 @ 100mm for 1/450 sec at ISO 200

Here’s another at 100mm, but below I zoom in…


f/5.6 @ 400mm for 1/340 sec at ISO 200

Zooming in to 400mm got me the scene I wanted
plus a bonus of noticing the person on top of the mountain!


f/8 @ 52mm for 1/85 sec at ISO 160

I failed to find a good angle for this amazing scene of these double falls, but the colors at sunset using Velvia film simulation were simply magnificent!


f/4 @ 34mm for 1/150 sec at ISO 320

This was a tough scene but it rendered it beautifully. Sure there would be more shadow details in cameras with better sensors, but creatively speaking this was spot on with nothing left to do but crop


f/22 @ 16mm for 1/160 sec at ISO 320

Sunset shots rendered nicely even though I had lots of schmutz on the lens


f/2.8 @ 16mm for 1/3200 sec at ISO 320

You have to view this one full size to appreciate it and the raw is even more spectacular

See a full gallery of unedited images taken for this review at https://photos.ronmartblog.com/fujifilm/x-t30.

Conclusion

As always, I really love the in-camera processing of Fujifilm X-Series cameras because I can call most shots done without ever editing them on the computer. It makes  a great travel camera with its biggest weakness is its noise at higher ISO’s compared to the competition, but Noiseware can address that difference.

In the end I enjoyed this camera and have no problems giving it a recommendation. Yes, it’s not in the same league as the latest cameras from Sony, but the fantastic in-camera colors are exclusive to Fujifilm so you have to decide where to make your tradeoffs.

Where to Buy?

CLICK HERE to learn more or buy today.

Other articles you may enjoy

If you enjoyed this article, you may also enjoy these:

Enjoy these and more on the Reviews tab as well as Ron's Recommendations.

Disclosure

If you make a purchase using links found in this article, I may make a commission. It doesn’t cost you a penny more, but it does help to support future articles like this.
NOTE: This site requires cookies and uses affiliate linking to sites that use cookies.

If you enjoyed this article, please support future articles like this by making a donation or saving money by using my discount coupon codes. Either way, your support is greatly appreciated!

This blog is intended for freelance writing and sharing of opinions and is not a representative of any of the companies whose links are provided on this site.

The opinions provided are of Ron Martinsen alone and do not reflect the view of any other entity