Friday, July 29, 2011

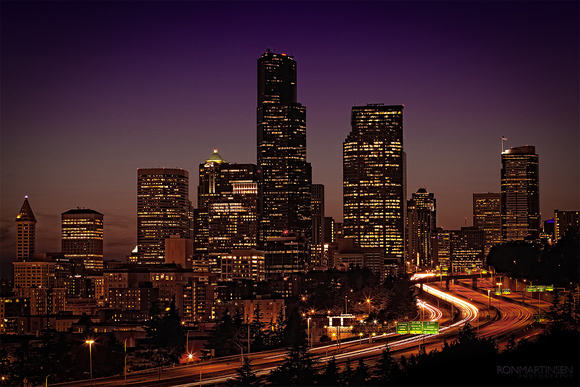
A View From My Treehouse This Morning

Treehouse - Copyright Ron Martinsen - ALL RIGHTS RESERVED
Copyright Ron Martinsen – ALL RIGHTS RESERVED

I’ll be writing more about my experience, but in the meantime here’s a teaser shot from where I woke up on Thursday morning.

This shot was intentionally processed a bit over the top for fun using Photomatix and Nik Software’s Color Efex. I had the realistic looking version, but said screw it and went for the fun and colorful look.

I hope you enjoy it.

Stay tuned for another more detailed article where you can learn more about where I was and how this blog can help you spend the night there!

Best wishes,
Ron

NOTE: This site requires cookies and uses affiliate linking to sites that use cookies.

If you enjoyed this article, please support future articles like this by making a donation or saving money by using my discount coupon codes. Either way, your support is greatly appreciated!

This blog is intended for freelance writing and sharing of opinions and is not a representative of any of the companies whose links are provided on this site.

The opinions provided are of Ron Martinsen alone and do not reflect the view of any other entity

Tuesday, July 26, 2011

Fun Video from 2D Photography Rube Goldberg

Enjoy!

NOTE: This site requires cookies and uses affiliate linking to sites that use cookies.

If you enjoyed this article, please support future articles like this by making a donation or saving money by using my discount coupon codes. Either way, your support is greatly appreciated!

This blog is intended for freelance writing and sharing of opinions and is not a representative of any of the companies whose links are provided on this site.

The opinions provided are of Ron Martinsen alone and do not reflect the view of any other entity

Photo of the Week - Candles

Candles ©

This shot was taken with a Sony Cybershot DSC-W120 (replaced now by the Sony Cybershot DSC-W220) and is unprocessed. What I love about it is that it follows my philosophy that if you are unhappy with a shot get lower and closer then try again. This is a great viewpoint of what could be a boring shot, but instead is very interesting. It also allows your mind to fill in the blanks so that any chocolate lover is going to imagine a delicious cake.

Congrats to Reza on proving once again that great composition can always make up for lack of gear, but the inverse is rarely true!

Be sure to click this photo above and leave some feedback on Flickr so this reader can get your feedback both good and bad (be gentle) and feel the love from our readers here!

Learn more about how you can participate in the Photo of the Week contest by clicking here.

NOTE: This site requires cookies and uses affiliate linking to sites that use cookies.

If you enjoyed this article, please support future articles like this by making a donation or saving money by using my discount coupon codes. Either way, your support is greatly appreciated!

This blog is intended for freelance writing and sharing of opinions and is not a representative of any of the companies whose links are provided on this site.

The opinions provided are of Ron Martinsen alone and do not reflect the view of any other entity

Monday, July 25, 2011

Guest Blog: Understanding 10-bit Color by NEC’s Art Marshall

NEC Display Solutions launched our first 10-bit color LCD, the 24” MultiSync PA241W, in February 2010. One of the questions that we are asked regularly by people evaluating all of our MultiSync PA Series models is “what is the difference between 8-bit color and 10-bit color?” and that is generally followed with “How do I get 10-bit color?” Ron and I have been discussing this for a while and, thanks to his feedback, we’ve put together something that I hope answers those basic questions.

Overview of LCD Color

(This is intended to give you a brief overview of the way that LCDs create color. For much more detail on LCD technologies, see the Wikipedia article on LCDs.)

Understanding how the computer creates color in an LCD is important to getting the most color from the display. Generally LCD pixels are made of 3 colored “subpixels”: red, green and blue (RGB). The LCD combines these subpixels based on the information that the computer sends over the video card. The amount of bits of color that the computer sends controls the number of colors that can be represented by the display, and the computer sends data for each of these three colors.

8 bit color: Typical desktop displays support 8 bits of color data per RGB channel. This means that there are 256 (8 bits) of possible values for each of the colors and combined the display can produce 16.8 million colors (256 x 256 x 256). This is also known as 24 bit color.

Why 30-bit color is better than 32-bit

10 bit color: MultiSync PA Series displays, when used with a compatible video card, support 10 bits of color data per RGB channel. This yields 1024 values for each color and a total of 1.07 billion (1024 x 1024 x 1024) possible colors that can be represented. This is also known as 30 bit color.

Side note: older display technology featured 32-bit output. This was actually a combination of 8 bits for each RGB channel as well as an alpha (transparency) channel. Comparing this to today’s technology, 30-bit technology is true 30 bits of color data compared to the 24 bits of color data in the older, 32-bit technology.

I have a 10-bit LCD, now what?

8-bit color display of dice courtesy of NEC

10-bit color display of dice courtesy of NEC

8-bit color

10-bit color

It turns out that every element of the combination of application software, operating system, video card, video connection and display must support 10 bit color in order to achieve true 10 bit color output.

Several video cards from major manufacturers including ATI (R6xx, R7xx, R8xx ATI Radeon hardware) and NVIDIA (Quadro series with DisplayPort, not Quadro FX) support 10 bit color. In addition, you need a DisplayPort connection to connect the video card to the display.

To enable 10-bit color on an AMD / ATI video card, click here. [Ron likes this doc better]

To enable 10-bit color on NVIDIA video cards click here. [Ron – nVidia calls this feature Deep Color in their drivers]

Finally, you need both operating system and application support for 10-bit color. 10-bit color is only available on computers running Windows XP, Windows Vista and Windows 7. MacOS versions including 10.6.x do not support 10-bit color output.

Application support for 10-bit color is constantly evolving. 10-bit color is typically only supported by software that uses either OpenGL or DirectX. Contact your software vendor for questions on 10-bit color support.

Most typical desktop configurations are limited by some component in the system and can only produce 8 bit color. For example, you could have a 10-bit LCD, 10-bit capable video card, DisplayPort video connection and Windows 7 operating system but without an app that can generate 10-bit color data, you will not see the advantage of those extra bits of data. By using the correct software, an operating system, video card and display that support 10 bit color, you can produce over 1 billion colors.

If you have an NEC MultiSync PA Series display, you can download a sample application (for Windows only) to see if your system is displaying 10-bit color. [Maximize and ALT+TAB between windows for the best result]

I hope that this helps. Contact me on Twitter using @Art_Marshall or post any questions in the comments!

Art Marshall is the Product Manager for Professional Desktop Displays, including the award-winning MultiSync PA Series, at NEC Display Solutions of America.

You can find more about NEC Display Solutions on twitter @NEC_Displays, on Facebook at http://www.facebook.com/necdisplay or at http://www.necdisplay.com/

Ron’s Reviews of NEC PA Series Displays

Click here to read Ron’s reviews of the 24 & 27” PA Series, or click here to read Ron’s review of the 30” PA series.

Photoshop & 10-bit Color Depth Support (by Ron)

While it isn’t very well documented (here’s the closest hit I found), both Photoshop CS4 & CS5 for Windows support 10-bits per channel color depth (30-bits total) by enabling the correct option in Open GL as shown in the following sections. I’m not currently aware of any support in Lightroom for this feature.

These directions will ONLY work if you are running a compatible video card using the correct cables (dual link DVI or DisplayPort) to a compatible display (like most, not all, NEC PA Series).

Enabling 10-bit Per Color Channel (30-bits total) in Photoshop CS4

SNAGHTML149cb279
Step 1 – Click Advanced Settings under Enable OpenGL Drawing

image
Step 2 – Match your settings as shown above (DO NOT check Color Matching)

Enabling 10-bit Per Color Channel (30-bits total) in Photoshop CS5

SNAGHTML14aeda73
Step 1 – Click Advanced Settings under Enable OpenGL Drawing

SNAGHTML14b9e6e1
Step 2 – Choose Normal or Advanced Mode and leave the check boxes checked

NOTE: I’ve got this working on my system before, but as of the time I wrote this article I could not get CS5 to work (CS4 on the same system worked fine). Each time it has been more challenging in CS5 to get this to work and has required multiple restarts of Photoshop to get accurate results.

Testing 10-bit Support in Photoshop

Download Ramp.psd from AMD (web search if link is broken) and open it in Photoshop. If you see this dialog:

image

just click OK. On a properly configured system you’ll see the correct results even using sRGB.

As the dice example above shows, in 8-bit you’ll see segments that clearly define the different shades of gray. In 10-bit per channel color you’ll see a smooth white to black gradient with no hint of any segments. If your video driver isn’t very good it can fail, and some buggy video drivers require you to restart Photoshop or even your system to get this to work properly.

NOTE: If you switch the settings on and off in a single session of Photoshop, you won’t see any changes unless you force a repaint so zoom in and then zoom back to actual pixels again to see the changes (again, ONLY on a properly function video driver).

A Word About 10-bit Per Channel Color Depth & Printing

The world of printing is way behind display technology, so Ron’s advice for those doing print soft-proofing is to DISABLE 10-bit per channel (30-bit total) color support from Photoshop. The reason why is that you’ll hide banding effects that might show in your print as many (not all) printers still only print in 8-bit using a much smaller color space, even if you enable 16-bit printing. This will result in printing surprises and therefore is not recommended.

More About High Color Support on Windows XP & Greater

To understand how and why Windows can support this advanced color mode when the Mac can not, please read this document. It helps to understand what is possible by software that may not support advanced color today. Please forward this link to your software vendor to help spread the word (i.e., educate them) on how they can add advanced color support to their products.

Disclaimer

NEC is a partner of this blog and has provided Ron with loaner PA series displays to review (all of which have been returned). Ron also owns a NEC PA series display that he purchased at B&H with no discount or assistance from NEC. Ron may get a commission if you make a purchase using links originating from this blog.

NOTE: This site requires cookies and uses affiliate linking to sites that use cookies.

If you enjoyed this article, please support future articles like this by making a donation or saving money by using my discount coupon codes. Either way, your support is greatly appreciated!

This blog is intended for freelance writing and sharing of opinions and is not a representative of any of the companies whose links are provided on this site.

The opinions provided are of Ron Martinsen alone and do not reflect the view of any other entity

Friday, July 22, 2011

Guest Blog: Shooting Weddings Part V: Contracts & Business Practices

Timothy Lusk is back to share some more of his pearls of wisdom on the subject of Wedding Photography. This is the last of five articles he’ll be sharing on this topic, so I hope you enjoyed his series!

B&H Wedding Photographers Buyers Guide

This is for everyone who has invested in a DSLR over the past few years and has either thought of shooting weddings or has been asked by a friend or family member due to their thought of either saving money or because the bride or groom isn’t aware of what goes into shooting a wedding.

There are plenty of questions that should be running through your head and asking not only the bride or groom, but yourself.

  1. Where is the wedding? Is it in a church? Is it an outdoor wedding? If it’s outside, is the wedded couple under a trellis or something that will produce shade?
  2. What are the expectations of the photographs? Doe the bride and groom “just” want the typical list? Is there a photographer that they love his or her style, but don’t have the budget for them?
  3. What can be expected of the event? Is it a quick ceremony on a beach? Is it a full day from sunrise to sunset and into the night?
  4. What equipment do you have in your bag? Do you need to rent any additional gear?
  5. Are you getting paid for doing this? If so, how much is your time worth to you? Are you thinking of this being a start to your wedding photography business, or is it going to be a one-time only offer?

Asking yourself these questions, can help you decide one of two things. Either you’ll move forward and step up to the plate, or you’ll play it cool and kindly decline.

For other articles in this series, please follow these links:

CONTRACTS

I want to take this last part of my Wedding Photography overview to discuss contracts. I am not going to just copy and paste a contract to review it and hand over the content needed… that’s too easy. A lot of what I have learned and refined over the years is thanks to a workshop I took under Mike Colon back at the WPPI conference in 2010.

To start, there are a few things that you should always note when starting to put together a good contract for weddings.

PRICE STRUCTURE

I’m listing this category first for a couple reasons. The first being, I want to stress that you charge for your services. I have never done a wedding for free–never. Yes, I’ve done one on a budget for $300, but that was not only my first wedding, but by charging for the wedding, I felt confident that it was something I could continue doing at a reasonable cost and not feel like I’m not charging what I feel I should be.

To start, I always ask for 50 percent deposit, remainder due on or directly before the wedding. Why? This might seem odd to not have even done the service yet, and still get paid the full amount. I grew up being a Boy Scout and have found that with the timeline of post production, etc. you have this notice to yourself (voice in your head) to finish the work on the photos and get them into a gallery for your client to view and buy.

Next, don’t sell yourself short. Before presenting your first contract, make a list of everything that you might need to be covering for that day. Gas for traveling, any rented gear (I’ve used LensProToGo.com [see the discount coupon code page]), any services you might use (ie web hosting), or memberships you might belong to (ie WPPI). By doing this, at the end of the wedding and handing off the photos, etc. you’ll see that you’ve succeeding in making a profit. The first handful of weddings I shot, I was putting half of the cost of my services into renting equipment and lenses for the wedding. And while it was well worth the cost of doing so for the quality of the images, if I was to go back to those, I would probably have a separate fee just to cover the cost of the rented gear and/or charge more per wedding to start.

TIMELINE (Day of)

No matter your cost, make sure you structure it in such a way to allow your client to understand a per hour cost if that helps them understand how the cost of a photographer is justifiable for a full day. You don’t have to directly note $200 per hour in the contract, but if you’re wanting to charge $200 per hour, make sure to that you base a 4-hour or an 8-hour day off of it.

Also, make sure that you monitor your time. If you’re shooting an 8 hour wedding and it goes into the 10+ hour evening, you want to have a clause that states something similar to “…15 minutes after the agreed end time, we will start to bill hourly in 15 minute increments at a rate of $200 per hour…”. Now you can be kind and if you see you’ve only had to spend an extra 30 minutes at the wedding, it’s probably silly to charge them, but if you’ve continued to capture images (per the clients request) beyond the end time, you’ll definitely want to get your money’s worth.

POST PRODUCTION (Day after)

I typically tell my client that I need 2-3 weeks (closer to 3) for editing. By doing this you help your client know that to expect the photos the next day isn’t going to happen, but at the same time (if you can manage your time well), you might be able to deliver earlier than expected.

First thing. Take a break. Ok, maybe go ahead and back up your cards, etc. to your hard drives or DVDs. But honestly, don’t dive into post production for a day or two. Let yourself rest from the event. Even though you know you’ve captured some great moments and want to view them immediately, I’ve found that I am more in tune with post production when I’ve mentally rested from the task of shooting for 8+ hours in a day.

The next task item is what I refer to as “please the bride”. I quickly go through the images and find 30-50 shots I think are worthy of my portfolio. I edit those, export them at a limited resolution with a watermark and upload them to Facebook, Flickr, the blog, and any other social web site I choose to help with marketing later on.

On to doing the work… I shoot upwards of 2500 images (if not more) during a wedding. Fortunately, my wife is a second shooter when we’re doing these gigs. The first step I take is importing (referencing) the images in Aperture (or Lightroom). I add meta data such as the names of the clients, venue, subjects, city, state, etc. that will help add to the library. I then go through all the images and break them into “albums” to relate them to the post wedding, getting ready, portraits, ceremony, reception, details and anything else I find is a chunk of the day. This helps the editing process seem less daunting. From there, my wife will help me throughout the first week to narrow down the images per category and we finally end up with 500 images or so.

After doing the detailed adjustments of color, etc. I upload them to Pictage [Ron’s favorite site is Zenfolio]  and it will usually cover a two-week editing process which results in a happy bride because I’ve delivered earlier than expected. Yes, this is an “ideal” structure. If you’re doing a 40 hour job on top of this, I would easily predict 3 weeks will be needed as I have been there myself.

DELIVERY

I have a few options the client can use. Pictage is a great online gallery with ordering services. There are multiple plans to choose from and based on the sales per wedding or portrait session, they will cut you a check for a percentage as well as cover the cost of the monthly dues if you’ve made enough in sales that month.

I will upload the selected photos via categories to allow the client to better sort through them this way. When you send you client the invite to Pictage (which I tend to do months before the wedding), they can invite friends and family to sign up for a notification and a small discount off their order.

Another service is album design. I have a great company out of New Zealand that I use. Queensberry has a very high quality structure as well as being archival with cotton pages and a great leather backing along with multiple sizes to your liking. While they are not cheap, the cost of them is very apparent. With a one-time investment, the company sends you sample albums to show off what the client will be gaining by investing in an album through you.

And finally, assuming you’ve built this into the cost of your contract as well, always be willing to provide your client with a CD of the images. This is the most common request, and don’t be offended by it as they have paid for them. The only thing you might suggest or recommend is either having them go through a professional printer and frame some of the select shots to hang in their home. On that note, at the very least, if they choose to only display them on Facebook to request they link them to you via a copyright notice or displaying your web site below the images.

FINAL NOTES…

Remember, these a more or less guidelines and things to remember when piecing together a contract. Even if you’re shooting your family members wedding or a long time friend, always have a contract to protect yourself from unwanted requests and needs. I have shot all of my weddings knowing that I have a contract in place to allow me to feel I have done a service and can continue with my life after the job is complete to not have random requests coming from a bride I shot 5 years ago for an 8×10 image.

Conclusion

I’d like to thank Timothy Lusk for taking the time to be a guest on my blog. I hope you enjoyed his series! You can find more of Tim’s work on his web site at http://www.luskshot.com/. He also has his own blog so if you enjoyed his articles here you can follow more like it on his blog.

Disclaimer

All articles in this series contain links to external sites which may result in a commission for purchases made. Thanks for supporting this blog by using the links!

Timothy Lusk also works at Microsoft Corporation where we both have day jobs in different groups unrelated to photography.

NOTE: This site requires cookies and uses affiliate linking to sites that use cookies.

If you enjoyed this article, please support future articles like this by making a donation or saving money by using my discount coupon codes. Either way, your support is greatly appreciated!

This blog is intended for freelance writing and sharing of opinions and is not a representative of any of the companies whose links are provided on this site.

The opinions provided are of Ron Martinsen alone and do not reflect the view of any other entity

Thursday, July 21, 2011

Ed Verosky eBooks

Edward Verosky is a creative portrait photographer who contacted back in April to tell me about his eBooks. I’ve been super busy with a stack of books as tall as my house, so I’ve only had a chance to glance through them. However, they seem okay and nice short books for those who want something to read while they are on the bus commuting to work. The prices are pretty reasonable, so they might be worth checking out:

100% Reliable Flash Photography

Taking Your Portraiture to the Next Level

Taking Your Portraiture to the Next Level II

Feel free to post comments about what you think about the books. Only respectful and constructive feedback will be tolerated, but I would love to hear what you think.

Disclaimer

Unlike my other reviews, I have not read these books from cover to cover. I do not have a recommendation status for these at this time due to this fact. This is merely a product announcement about the availability of these books.

I may get a commission if you purchase using the links in this article.

NOTE: This site requires cookies and uses affiliate linking to sites that use cookies.

If you enjoyed this article, please support future articles like this by making a donation or saving money by using my discount coupon codes. Either way, your support is greatly appreciated!

This blog is intended for freelance writing and sharing of opinions and is not a representative of any of the companies whose links are provided on this site.

The opinions provided are of Ron Martinsen alone and do not reflect the view of any other entity

Tuesday, July 19, 2011

Photo(s) of the Week – Mandy Paul

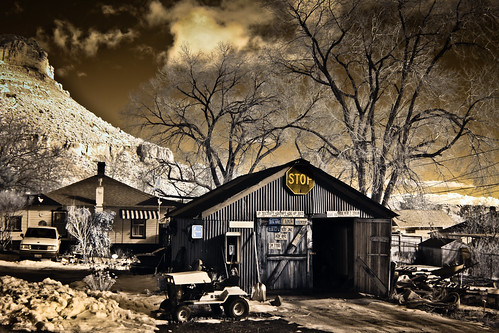
Stop Shack

I’m breaking with tradition and selecting two photos for the photo of the week only because I had a draw and discovered that both were from the same photographer – Mandy Paul. Both shots were taken with a Canon 50D, with the one at the bottom of the page being a from Mandy’s 50D after it was converted to an infrared camera.

I’ve separated the two shots as they have drastically different tones so they clash when viewed side by side, but independently they both look pretty neat.

I liked the top image for quite some time as it’s been the runner up for the photo of the week at least 5 times. There’s nothing super special about the composition other than the reality that you feel like you’re a in a blast from the past at a farming town. The photo was taken in 2010 and processed in a way that gives it some fun character but also keeps a little color that really appeals to me. I really enjoy the processing of this photo a lot.

The photo on the bottom image exhibits stark blacks and whites due to the infrared effect which I think works very well for this image. It’s one that I think would make a great print too!

Congrats to Mandy on these two fun images where you had the courage to experiment!

Be sure to click this photo above and leave some feedback on Flickr so this reader can get your feedback both good and bad (be gentle) and feel the love from our readers here!

Learn more about how you can participate in the Photo of the Week contest by clicking here.

Palm Tree on Anakena Beach (Infrared)

NOTE: This site requires cookies and uses affiliate linking to sites that use cookies.

If you enjoyed this article, please support future articles like this by making a donation or saving money by using my discount coupon codes. Either way, your support is greatly appreciated!

This blog is intended for freelance writing and sharing of opinions and is not a representative of any of the companies whose links are provided on this site.

The opinions provided are of Ron Martinsen alone and do not reflect the view of any other entity

REVIEW: Think Tank Photo Shape Shifter®

This is the review I thought I’d never write. The reason why is because when I first got this bag I was very unimpressed with it. So much so that it sat in my closet for 6 months before I finally decided to try it out. I had already planned to give it away after my review was done as I simply had no desire to own this bag.

That was then, and this is now.

For my recent trip to Texas I found myself needing a backpack that could hold my 17” MacBook Pro plus some other things, but only a limited amount of camera gear (rare for me) as shown below:

Now I had a wide variety of chargers, cables, doodads (i.e., Hoodman Loupe, Pixel Rocket, Purosol lens cleaner, etc…), etc… as well as Speedliter's Handbook (which I’ll be reviewing soon) and some magazines.All of which packed this bag to maximum capacity making me and my bad back very thankful for its chest and waist straps to help distribute the load.

Despite its size with all of my crap in it, I was able to easily fit this big bag under my Alaska Airlines coach seat and still squeeze my size 13 shoes and 6’1” frame into my seat without spilling over into another seat or the aisle. This gave me the freedom to extract phones, laptops, books, chargers, etc… out during the flight for myself and my family of 5.

Photos

Front View as Delivered

Rear View with Support Straps Out (they can be tucked away)


Side View – Expanded but Empty


Side View – Minimum Depth Empty

Video

Play in HD

This is probably the worst of my videos because after two hours of fighting with video software on the Mac and PC, I finally gave up and just tossed the thing on YouTube as is. I didn’t have the time tonight to do a second cut, so it’s pretty raw footage – with flaws and all. However, this is a bag where a video is a must as you have to see live footage on how the interior works as photos are useless.

Conclusion

If you want to carry a big laptop in your backpack and you like lots of pockets, then this is your bag! It’s very comfortable to wear even under heavy loads (and I know – I had it maxed out for a week of travel) and the usefulness of the many pockets are the best I’ve seen on a Think Tank Photo bag. Laptop users will love it!

The only thing I can knock this bag for is the lack of configuration options in the center due to its design. Personally I just don’t get that part of this bag. Perhaps readers will enlighten me, but I don’t see the value of collapsing the center – it’s then not even as useful as a normal backpack – it’s just an overweight and thick laptop bag. Personally, I’d rather see this bag design with a traditional TTP center with configurable dividers. Perhaps the Streetwalker HardDrive (see my review of the Streetwalker Pro) is supposed to fulfill this need, but that’s only useful if you have a 15” laptop. I’ve always carried 17” laptops for as long as they are available, so my message to Think Tank Photo designers is to consider some hybrid of this bag design with the center portion replaced with the configuration design of the Streetwalker series – to me that’d be the perfect back pack! It’s even better if it can be done in a way where the dividers aren’t so tall that I can stuff my bag under the seat on a plane as I could do with this one.

FREE STUFF: Special Offer on ALL Think Tank Photo Bags

Click here for special offer details... or just click this link for the Shape Shifter to order and you’ll be given a special offer before your order is submitted.

Other Think Tank Photo Bag Reviews

Considering other Think Tank Photo bags? Then take a few moments to check out these other reviews found on this blog:

Disclaimer

I was provided a free bag for testing for the purpose of this review. If you purchase TTP bags using links on this blog I will get a small commission, so I appreciate your support by using the links here!

NOTE: This site requires cookies and uses affiliate linking to sites that use cookies.

If you enjoyed this article, please support future articles like this by making a donation or saving money by using my discount coupon codes. Either way, your support is greatly appreciated!

This blog is intended for freelance writing and sharing of opinions and is not a representative of any of the companies whose links are provided on this site.

The opinions provided are of Ron Martinsen alone and do not reflect the view of any other entity

Monday, July 18, 2011

Guest Blog: Shooting Weddings Part IV: Gear

Timothy Lusk is back to share some more of his pearls of wisdom on the subject of Wedding Photography. This is the fourth of five articles he’ll be sharing on this topic, so I hope you enjoy it.

This is the next segment after Tim’s Shooting Weddings Part III: Inspiration, but his article was heavily Nikon-centric so I’ve made adjustments to relate to Canon users as well. New readers to my blog will find my Which DSLR Should I Buy? and Which Lens Should I Buy? articles to be useful as any of the recommendations here mirror my non-wedding recommendations also.

B&H Wedding Photographers Buyers Guide

This is for everyone who has invested in a DSLR over the past few years and has either thought of shooting weddings or has been asked by a friend or family member due to their thought of either saving money or because the bride or groom isn’t aware of what goes into shooting a wedding.

There are plenty of questions that should be running through your head and asking not only the bride or groom, but yourself.

  1. Where is the wedding? Is it in a church? Is it an outdoor wedding? If it’s outside, is the wedded couple under a trellis or something that will produce shade?
  2. What are the expectations of the photographs? Doe the bride and groom “just” want the typical list? Is there a photographer that they love his or her style, but don’t have the budget for them?
  3. What can be expected of the event? Is it a quick ceremony on a beach? Is it a full day from sunrise to sunset and into the night?
  4. What equipment do you have in your bag? Do you need to rent any additional gear?
  5. Are you getting paid for doing this? If so, how much is your time worth to you? Are you thinking of this being a start to your wedding photography business, or is it going to be a one-time only offer?

Asking yourself these questions, can help you decide one of two things. Either you’ll move forward and step up to the plate, or you’ll play it cool and kindly decline.

For other articles in this series, please follow these links:

IN THE BAG

So you’ve bought your first DSLR camera and you’re thinking of shooting a wedding or two, or making it something you will turn into as a business or side job because you’ve uncovered your passion for photography and see that it’s a great way to earn some extra cash.

In this post, I will inform you of why wedding photographers have the gear they do. It’s not as much as you think.

NOTE: I am a Nikon shooter, but most everything is also available via Canon or another camera manufacturer. [I’ve got you covered Canon shooters, read on – Ron]

BODIES

Today, there are plenty of models to choose from within each make of camera. However, this doesn’t mean that the body will be suited well for shooting a wedding. Similar to sporting events, a wedding is comprised of a variety of moments. Ones that are fast (dancing and the bouquet toss), ones that are time consuming (portraits and the ceremony), and moments that only happen once in the whole day (the first kiss and placing the rings on the finger). Each of these are something that you need to take into consideration not only as a talented photographer, but with the idea of “will my gear handle capturing that moment?”

ENTRY LEVEL (Nikon D5100)*

While these cameras are amazing with their technology (16.2 Megapixel and 1080p movie functions), they often are not ideal for shooting weddings because they don’t have a fast enough frame rate to cycle through a specific moment in a wedding.

I do think that if you’re looking to have a second body on hand, this is a great option though. Because of its movie function, you can easily promote this as part of your contract.

Ron’s 2 Cents: Consider the step up to the D7000 from Nikon if you can afford it or the Canon T3i.

PROSUMER (Nikon D300s)

Here is where you can start seeing some serious results in photographing a wedding. The D300s allows you to gain 6-9 frames per second (FPS) depending if you have the MB-D10 battery pack on it. Not only does this type of camera offer a fast frame-rate and some other features that the lower-end models don’t, but it is also commonly built with more durable materials, including a magnesium body to improve weather sealing.

These bodies are also considered “cropped”. By this, it allows the sensor to increase the distance the lens covers when mounted on the body. Most often, a cropped body will have a magnification of 1.6 times what a full-frame or 35mm camera will display in the viewfinder. So, a 50mm lens on a 35mm camera will actually read at 80mm on a cropped body.

Ron’s 2 Cents: A side-by-side comparison of the D7000 and D300s make it a tough choice, but for wedding photographers I’d probably agree with Tim’s suggestion here from Nikon. For Canon your best bet is the 7D as the 60D isn’t significantly different than the T3i (not true of xxD series in the past). The performance and AF system of the 7D are also going to be a wedding photographer’s best friend during a hectic day of shooting.

PRO (Nikon D3s)*

While they aren’t required to shoot weddings (in my opinion), a D3s (or full-frame camera) is a great asset to your bag. Shooting the weddings I have over the years, I have moved from just using a D300 to a D3, and now a D3s. The advancements over the years with this body has made my enjoyment of shooting a wedding that much more fun. The reason I say this is due to the high ISO/low noise combination and the fast frame rate (up to 11FPS). And while I don’t use the video function on the camera, the fact that it can do video has improved the recycle of image capture greatly over the D3.

Know your camera well. Quickly adjusting ISO, bracketing, etc. You want to be able to move fluidly throughout the day without looking back and thinking “I missed the first kiss!” Another critical note is the always have two bodies with you when shooting a wedding. Not only does it allow you to have multiple lenses at a quick access, but if one fails (knock on wood) you have another as backup.

*While the D3s is the top full-frame body, if you prefer a more compact version feel free to check out the D700.

NOTE: It is said that the D4 and D400 will be announced in August 2011, so if you’re able to wait until then, I highly recommend doing so.

Ron’s 2 Cents: Even as a Canon shooter, I’d say that the D3s is probably the best choice for wedding photographers at this time in the pro body format. It’s sensor has outstanding noise control at higher ISO’s which will give you a couple stops advantage over the Canon (despite what marketing data says). The Canon 1D Mark IV has a better AF system (when you know how to use it – see my 1D Mark IV guide) and the Canon 1Ds Mark III has a great sensor, but this is one area that I think is purely an advantage for Nikon – at this time (things change fast).

LENSES

While you can spend thousands on a set of lenses based on what you see the professionals carry around, I have found that this is what you’ll really need (Ron’s Canon recommendations after the forward slash):

Nikkor 24-70mm f/2.8 (35-70mm f/2.8 D) / Canon 24-70mm f/2.8L USM 

Nikkor 70-200 f/2.8 (80-200mm f/2.8 D) / Canon 70-200mm f/2.8L IS II USM 

Nikkor 105mm f/2.8 Macro (60mm f/2.8 D Macro) / Canon 100mm f/2.8L H-IS Macro

Nikkor 85mm f/1.4 (85mm f/1.4 D) / Canon 85mm f/1.2L 

Nikkor 50mm f/1.4 (50mm f/1.4 D) / Canon 50mm f/1.4 

There will be other alternatives to this list, and I have added the D-Model in parenthesis to show less expensive options that are just as great. (Ron – I haven’t included the Canon EF-S lenses as this subject is covered in my Which Lens Should I Buy? article)

Even though having a photographic eye is a main key to shooting a wedding, the glass is VERY important as well. I am an Aperture Priority shooter and all my glass is f/2.8 or faster (and it’s needed).

KIT LENSES (18-55mm, 55-200mm)

While I am not going to promote these lenses as a good option to shoot a wedding, I will mention where they can be used if you choose to do so. If you’re shooting all day, the 55-200 will be great for you to keep your distance and take some candid photos during the ceremony and other times when you don’t want to be “in their face” with the lens to capture an intimate moment. The 18-55 might be something you can use for the portraits, but throughout the wedding, I don’t advise using it (beyond the portraits).

The reason kit lenses aren’t really something you want to be using is due to a couple things. They aren’t as sharp as the other lenses mentioned above, the quality of build isn’t rugged enough, and they aren’t considered “fast glass”. The aperture ratings on these are listed with an f/3.5-5.6 structure usually that means at the closest (18mm) you can only open up to 3.5 and at 200mm you can only read out at f/5.6. These are reasonable, but not an ideal choice for shooting weddings that tend to be set in low light environments.

Fast glass refers to lenses that not only can focus quickly, but more importantly have a single aperture rating (ie 1.4 or 2.8) across the length of a telephoto lens (ie 70-200mm).

Ron’s 2 Cents: People should be paying you to photograph a wedding, so if they are then you owe it to them to use better quality glass. Don’t capture someone’s once in a lifetime moments on cheap kit lenses.

PRO (24-70mm, 70-200mm)

These lenses are what make or break a wedding photographer. Without the focal length or the aperture, you’ll be doing a lot more post-production than you’ll want to spend after shooting for 12 hours.

Ron’s 2 Cents: Agreed – applies to Canon as well and the new II version of the 70-200 is worth the upgrade

PRIME (50mm, 85mm)

I personally love prime lenses. Not only do they offer a wider aperture, in some cases they are sharper than telephoto models. Both of the primes I have listed above are great. My one note though is pertaining to cropped sensors. If you’re shooting with a D300s (or similar body), the 50mm is going to be 80mm compared to the 85mm on a full-frame camera. I only own the 50mm at this time for this reason and use it mostly for close portraits of the bride and any detail shots where I want a great bokeh on the image.

Ron’s 2 Cents: Agreed – Canon users should consider the 1.2L version of the 50mm if you can afford it as it’s a much better choice for wedding photographers due to its improved indoor autofocus performance. Image quality-wise the 1.4 is close enough, so the upgrade is purely for that extra stop and AF performance. Canon’s 85mm f/1.2L has no equal in my book, so its’ a must own for the wedding photographer.

MACRO (105mm)

This is a must-have lens for weddings. The rings, dress details, food, and other parts of the wedding that make it unique to the bride. This is where this lens comes in handy.

Ron’s 2 Cents: Canon offers two 100mm macro lenses and both are fantastic. You can see my comparison of them in this review, and my long-term assessment is that the non-L is just as good as the L for most uses. If you can afford to get the L get it – especially if you own a 7D or 1D Mark IV that can take full advantage of the Hybrid IS – but you aren’t missing much by getting the cheaper non L version whose image quality appears to be just as good.

OTHER GEAR

FLASH

If you can, avoid using the on-camera flash (get a TTL cord) and add an off-camera flash (SB-900 / 580EX II for Canon) to it. I have a Stroboframe that allows me to swing the flash in multiple directions for bouncing the light off walls, etc. so the light isn’t harsh and directly on the subject. And while do have this ability, since 2008 I really haven’t used the flash or mount system during a wedding. I prefer a very relaxed and candid style with my photography and a flash is just calling for “look at me”.

Ron’s 2 Cents: I highly recommend the Quantum QFlash and Custom Bracket I reviewed, but it is bulkier so you’ll have to decide on performance versus size on this one.

LIGHTING

During the portraits and other formal gatherings of the family and wedding party, it is nice to have a portable lighting system, but isn’t necessary for a wedding. If you simply remember to find a well lit space (outdoors or not) that will give you good lighting on the party, you’ll be able to get some great shots. I personally use Profoto for my lighting equipment, but don’t use it during a wedding.

Ron’s 2 Cents: If you can take a compact system like the Elinchrom Quadras that I have in my lighting setup then you’ll have a great product for a group shot. You’ll have to get extension cables and still need big light modifiers, but if you’ve got a good assistant then it’s a worthwhile addition. It’s also a big hassle so I’d only do this as an option for an extra fee to my wedding party client.

MEMORY CARDS

My general rule of thumb on memory cards is anything larger than 8GB is unnecessary. The reason for this is two-fold. One, I can shoot 600+ images (RAW) on one card. I typically cover 2500-3000 images per wedding. And the other is due to DVD backup and fear of a failed card. One DVD can house 360 (RAW) images. So it’s pretty easy for me to quickly split an 8GB card in two and burn two discs. I currently use the SanDisk Compact Flash cards. The day before every shoot, I reformat the cards in camera. This helps restore the cards to their default structure and clean out any “hidden” files. Don’t be afraid to buy these whenever you find spare money to spend. You can NEVER have enough.

You might wonder, how do you keep track of what you’ve shot so far? I use a Pelican CF card holder (2 of them actually). One contains my 4GB cards, and the other 8GB. I start out with all of my cards face-up. Then, when I’ve filled up a card and eject it from the camera, I place it face-down in the Pelican case. The first wedding I shot, I just kept them in separate cases and had to juggle through the LCD viewer to see if I’ve used the card yet. The Pelican is well worth the $20 to save the time frantically going through cards during the wedding.

Ron’s 2 Cents: Personally I prefer Think Tank Photo’s Pixel Pocket Rocket for holding my cards as it is smaller and holds more. What’s more its an option you can get free when you purchase Think Tank Photo bags from this blog. I do agree that SanDisk makes great cards, but I’ve been happy with Lexar too (see what I use). I personally don’t like to use cards larger than 8GB unless doing video as I like to distribute my risk on multiple cards in case of a failure. In addition, when using pro bodies like the Canon 1D Mark IV you can write your images to the CF card as well as the SD card at the same time for redundancy to avoid losing an image due to a card failure. I do agree with Tim though that you can’t have enough, and you don’t have to own the fast cards made.

ALERT: Through July 30th, memory cards are on sale at B&H – stock up now!

Conclusion

If you are wondering about the gear mentioned above, you can see the full list online at B&H [and via the various categories in Ron’s Holiday Gift Guide 2010 – Ron]. Also, if you’re not sure about investing in the lenses and equipment right from the start, please rent it. Read more about rental services here as I rented my gear for years until I was able to amass a collection that covers what I need to shoot a wedding.

Disclosure

This article contains sponsored links to B&H. Ronmartblog.com may get a commission if you make purchases using the links in this article. Thanks for supporting this blog by using the links when you make your purchases!

NOTE: This site requires cookies and uses affiliate linking to sites that use cookies.

If you enjoyed this article, please support future articles like this by making a donation or saving money by using my discount coupon codes. Either way, your support is greatly appreciated!

This blog is intended for freelance writing and sharing of opinions and is not a representative of any of the companies whose links are provided on this site.

The opinions provided are of Ron Martinsen alone and do not reflect the view of any other entity

Friday, July 15, 2011

Photo Thoughts–Editing Seattle with Nik Software

If you missed the Nik Software webinar by Janice Wendt (see here), I’ve created a video where I try to replicate what she did based on my own notes from her presentation. This results in my workflow being a more choppy than it typically is, but hopefully you’ll still get something out of it.

I recommend you view these videos in full screen using HD and turn your sound volume level up.

I begin by using Dfine to do noise reduction on the image to prepare it for the rest of its editing journey:

Play in HD

Here’s part two where I edit the image using Viveza:


Play in HD

and finally here’s part III where I finish up using Color Efex:


Play in HD

Nik Software Product Reviews

You can see Ron’s reviews on Nik Software products below:

To hear Nik Radio’s interview of Ron (9/23/10 episode #41), click here.

Special Offer

To get a discount just enter the code (see my discount coupon code page for updates if this doesn’t work):

Shopping cart code subject to change

If you did everything correctly you should see the correct price. My code also works for other versions – not just upgrades, so save on most Nik Software products when you use this code!

Prices subject to change without notice. I will get a commission and you’ll get a discount if you purchase using my code, so help us both by using the code!

NOTE: If any other codes are listed please choose REMOVE and enter mine as it’s the best deal you can get for this product!

Nik Software customers in Europe should contact europe@martinsen.com to get more information about the discount.

Disclosure

Nik Software is a partner of this blog. If you make a purchase using my code, I may get a commission. Please support this blog by using my coupon code. This is a video I created based on the content of the webinar presented by Janice Wendt at Ron’s request to Nik Software as a public service to his readers.

NOTE: This site requires cookies and uses affiliate linking to sites that use cookies.

If you enjoyed this article, please support future articles like this by making a donation or saving money by using my discount coupon codes. Either way, your support is greatly appreciated!

This blog is intended for freelance writing and sharing of opinions and is not a representative of any of the companies whose links are provided on this site.

The opinions provided are of Ron Martinsen alone and do not reflect the view of any other entity

Seattle Photography Workshop with Ron Martinsen on August 20th, 2011

This workshop has been rescheduled. Click here for the full details.

NOTE: This site requires cookies and uses affiliate linking to sites that use cookies.

If you enjoyed this article, please support future articles like this by making a donation or saving money by using my discount coupon codes. Either way, your support is greatly appreciated!

This blog is intended for freelance writing and sharing of opinions and is not a representative of any of the companies whose links are provided on this site.

The opinions provided are of Ron Martinsen alone and do not reflect the view of any other entity

Wednesday, July 13, 2011

Apple OS X–Lion Compatibility Info

Image Copyright (c) Apple

As of the time I’m writing this, it is rumored that Apple’s next major operating system upgrade of OS X (10.7 – code name Lion) is due to be released very soon. As a result, the burning question will be – should I upgrade? Here’s some things to consider if you use these products…

Nik Software

Here’s what Nik Software has to say about Lion:

Apple is expected to release the latest version of Mac OS X, version 10.7 Lion, sometime this month. We've been working with developer release versions and want to notify you that we've found an issue installing some of our plug-ins into Photoshop CS5 after you've updated to Lion.

If you have already installed your Nik Software plug-ins into Photoshop CS5 prior to updating to Lion, the plug-ins will continue to work without issue. There are also no issues installing our plug-ins into Lightroom or Aperture on a Mac running OS 10.7 Lion and no issues installing HDR Efex Pro into any host application.

However, the current installers for Dfine 2.0, Viveza 2, Color Efex Pro 3.0, Silver Efex Pro 2, and Sharpener Pro 3.0 are not able to install into Photoshop CS5 on a Mac running OS 10.7 Lion. This issue will affect both new and re-installations of these plug-ins.

Our engineers have already begun working on a fix for the installers and we intend to start releasing these free updates this month. Each update will be released in succession, starting with Silver Efex Pro 2 and we will notify registered owners via email.

If you do find yourself needing assistance, please don't hesitate to contact our support team. Thank you for your continued support!

The Nik Team

onOne Software 

All onOne Software products must be deactivated before installing Lion and PhotoTools will not work until an update becomes available. PhotoFrame will only work in stand-alone mode. I would encourage ALL onOne Software users who want to use Lion to read this statement.

Alien Skin Software

Only minor issues exist and updates are available. Read here to learn more.

X-Rite

Of all the products I know of so far, the worst impacted seems to be X-Rite (especially those running Monaco, ProfileMaker, and i1Match software. ALL X-Rite users should read this page and DO NOT upgrade until you understand the ramifications.

What About Others Like Photoshop, Lightroom, etc…?

I’ll report back as I hear more from other companies, but in the meantime here’s a good Wiki that has a lot of other apps with reports of their status on Lion.

UPDATE: Here’s another great wiki specific to Photographers with compat info from my friends at Chromix.

Ron’s Advice

I’m going to hold off for a bit to see how things shake out before I upgrade. While I’m sure Lion will be a nice upgrade, Apple has gotten a large enough installed base and application support now to feel the pain that Microsoft goes through when upgrading Windows. This means you don’t know what you don’t know, but when it hits the streets some nasty bugs are sure to be discovered. Once things settle down I’ll upgrade my Mac’s, but until then I’m going to let it bake for a while longer.

I suggest that you consider a similar strategy and wait until your apps are confirmed to work or be updated before taking the plunge.

NOTE: This site requires cookies and uses affiliate linking to sites that use cookies.

If you enjoyed this article, please support future articles like this by making a donation or saving money by using my discount coupon codes. Either way, your support is greatly appreciated!

This blog is intended for freelance writing and sharing of opinions and is not a representative of any of the companies whose links are provided on this site.

The opinions provided are of Ron Martinsen alone and do not reflect the view of any other entity

Monday, July 11, 2011

Photo of the Week–Chateau Tanunda Tasting Room

Chateau_Tanunda_Tasting Room_©AleemHossain2011

Okay, I’ll admit that compared to the last few Photos of the Week, this one has a few issues that should have been addressed in the post-processing of this shot. However, what I like about this HDR shot taken with a Canon 60D are the colors and tones of the shot.

Sure there are issues with the crooked lean and framing that make it far from perfect, but for some reason I’m drawn to this image. Perhaps its because I want to sit in one of those chairs and enjoy one of those bottles on that cool table, or perhaps it’s the cheesy but fun red walls. Whatever it is, I like it – despite its imperfections.

The photo of the week isn’t about perfection, its about having an interesting shot that makes me sort through the pile and stop and say “cool, I really like that.” In reality, that’s a lot of what commercial photography is about too – it’s not about sharpness, or technical perfection, but rather grabbing the eye of a consumer who is inundated with thousands of photos so I commend Aleem for accomplishing that with this photo – well done!

Be sure to click this photo above and leave some feedback on Flickr so this reader can get your feedback both good and bad (be gentle) and feel the love from our readers here!

Learn more about how you can participate in the Photo of the Week contest by clicking here. Remember, I’m not looking for technical perfection but rather photos that strike me as interesting. If you like your shot, I might too so please join in by submitting your shots!

NOTE: This site requires cookies and uses affiliate linking to sites that use cookies.

If you enjoyed this article, please support future articles like this by making a donation or saving money by using my discount coupon codes. Either way, your support is greatly appreciated!

This blog is intended for freelance writing and sharing of opinions and is not a representative of any of the companies whose links are provided on this site.

The opinions provided are of Ron Martinsen alone and do not reflect the view of any other entity

Guest Blog - Shooting Weddings Part III: Inspiration

Timothy Lusk is back to share some more of his pearls of wisdom on the subject of Wedding Photography. This is the third of five articles he’ll be sharing on this topic, so I hope you enjoy it – Ron

B&H Wedding Photographers Buyers Guide

This is for everyone who has invested in a DSLR over the past few years and has either thought of shooting weddings or has been asked by a friend or family member due to their thought of either saving money or because the bride or groom isn’t aware of what goes into shooting a wedding.

There are plenty of questions that should be running through your head and asking not only the bride or groom, but yourself.

  1. Where is the wedding? Is it in a church? Is it an outdoor wedding? If it’s outside, is the wedded couple under a trellis or something that will produce shade?
  2. What are the expectations of the photographs? Doe the bride and groom “just” want the typical list? Is there a photographer that they love his or her style, but don’t have the budget for them?
  3. What can be expected of the event? Is it a quick ceremony on a beach? Is it a full day from sunrise to sunset and into the night?
  4. What equipment do you have in your bag? Do you need to rent any additional gear?
  5. Are you getting paid for doing this? If so, how much is your time worth to you? Are you thinking of this being a start to your wedding photography business, or is it going to be a one-time only offer?

Asking yourself these questions, can help you decide one of two things. Either you’ll move forward and step up to the plate, or you’ll play it cool and kindly decline.

For other articles in this series, please follow these links:

INSPIRATION

Today, almost every photographer in the wedding business is required to have a website, blog, Twitter account, and Facebook page just to get their names out there and compete against the others.

Mike Colon, Chase Jarvis, Paul Dudley, Laurel McConnell. These are just a few photographers I got to know early on that inspired me to further challenge myself and develop a style that is unique unto myself and what I can offer my clients.

Chase Jarvis | chasejarvis.com

He is Seattle-based and has been involved with extreme sports and outdoor companies for years. I first stumbled upon him in 2007 with a random interest in finding some creative iTunes podcasts to further my understanding of photography. Since then I have kept him in my sights for inspiration. While he has no wedding references (to my knowledge), I still like referencing his stuff to seek out new ways to compose my clients and the photos themselves. Even when something has no relation to a particular subject, you can still draw inspiration and adapt it accordingly.

Mike Colon | mikecolon.com

I refer to as my “Arnold Schwarzenegger” of the wedding photography world (in a positive way). The reason for this? He was the first wedding photographer I really knew of that made me think “this would be fun to do”. Along with his fresh look at shooting weddings and having the high-end clientele, it was easily a way for me to learn from a “great” in the business.

Not only does he shoot Nikon, like me, which helped me understand what kind of gear to invest in for the purpose of shooting a wedding, but his approach to shooting the wedding was exactly how I wanted to do so. That being said, I have had the pleasure of taking a workshop from him and learned a lot–not only about shooting, but how to manage the business at hand and getting the right clients.


2010 WPPI Las Vegas Mike Colon Workshop

Laurel McConnell | mcconnellphoto.com

I know Laurel through a school friend of mine who had her photograph her wedding back in 2009. She’s got a great personality and definitely makes the bride and groom feel comfortable for the occasion. While her style of shooting is a great reference to get some ideas on how I should approach a similar shoot, I think knowing her personally has been a better benefit to my business and how I go about a day of shooting.

Paul Dudley | pauldudleyphotography.com

I consider Paul a great inspiration, friend, and my photography mentor. And for anyone who is looking to get into the business, I recommend finding a mentor to help guide you through the proper steps to start marketing yourself to the right clients. He has actually taught me more about photography in general over the last four years than I could have even thought of grasping if I took a class or attempted to earn another degree.


Slattery Wedding - Second shooting for Paul Dudley, July 2010

So, to take this chapter to the next step I wanted to give you some tips on what I have learned from these photographers.

Chase Jarvis / While it is said that “a picture is worth 1000 words”, make sure they are the right words. What I mean by this is that with Chase’s work I have found that while you might be able to get the story right with a simple portrait, think about all the options of how you can approach the shot before you release the shutter. You’ll be amazed at what can come from an additional minute or two analyzing your surroundings.

Mike Colon / High quality, high end approach. Photography is an art. It is subjective. Everyone has their own opinion about what is good. You have to be ready for criticism. While Mike might shoot weddings for nothing less than $25,000, I still approach the job with the same mindset even though I am making only a fraction of what he charges. If you’re looking to grab a high-end bride as a client, make sure your photography reflects this. How so? While a wedding can appear to cost into the six figures, a lot of times weddings might come in around $10,000-$15,000, and that’s if the bride and groom aren’t paying for it themselves. A bride who comes from a wealthy family is usually well educated in fashion and trends to know whether the photos from the previous weddings you’ve shot are on a budget or have spared nothing for every detail. In short, when you look through the viewfinder, ask yourself “is this the million dollar shot?”

Laurel McConnell / Network. Network. Network. Knowing Laurel over these past few years, I have seen her go from a social butterfly with a shutterbug attitude, to someone who is now networking with the likes of Nikon and Junebug Weddings. Even though someone might see this as a “sellout” when it comes to being a wedding photographer, it is actually a HUGE plus for a photographer to start making connections like this for the latest in gear as well as gaining a name in the industry as one to know.

Paul Dudley / Cater to everyone and feel comfortable with introducing yourself. Another part of being a good wedding photographer is to adapt to the needs of your client. Make sure you’re very comfortable with your gear as well as your approach to the way you want to shoot the event. Adapt and make the most of what you have. Sometimes you’ll expect that the environment will be ideal due to rumors and what you’ve heard about the venue. Other times you’ll be in cramp quarters just to make sure you can get the shot of the bride putting on her dress.

OTHER NOTES OF INSPIRATION…

Even though you can search through books, blogs, and numerous other reference guides that are specifically about wedding photography, remember to look to other subjects and themes to draw inspiration. Yes, it’s great to have a site like Flickr where you can uncover the EXIF data of a photo taken by someone else, but in the end it’s all about what your eye sees, not what the camera is setup to do.

If you’re one who would like some tips on magazines and blogs to start referring to, the one I want to stress most is part of the Wedding & Portrait Photographers International (WPPI). Visit www.rangefindermag.com and www.aftercapture.com to sign up for their FREE publications. Beyond that, check out magazines that are local to your community, such as Seattle Metropolitan Bride & Groom or Seattle Bride. From those magazines you can tend to find local photographers whom you can follow from their blog to gain further inspiration and see if there are any tips and tricks that might become useful the next time you book a wedding.

To end, if wedding photography is something you’re serious about and want to make a career out of, make sure to start networking with everyone. Make sure you find a niche that can sell yourself as the photographer every bride desires. Make sure your work speaks for itself and can stand alone. And, above all else, be yourself. While you can look at these photographers’ work above and get some ideas, you should never copy someone’s work with the intent of selling it off as your own.

Conclusion

Stay tuned for more articles from Timothy Lusk. Visit the links at the top of this article to see other articles in this series.

NOTE: This site requires cookies and uses affiliate linking to sites that use cookies.

If you enjoyed this article, please support future articles like this by making a donation or saving money by using my discount coupon codes. Either way, your support is greatly appreciated!

This blog is intended for freelance writing and sharing of opinions and is not a representative of any of the companies whose links are provided on this site.

The opinions provided are of Ron Martinsen alone and do not reflect the view of any other entity

RonmartBlog.com Presents Recapture Your Vision with Nik Software: Presented by Janice Wendt (TODAY)

Ever wonder why your captured images do not live up to your expectations? The exposure was right, the lighting was right, and most important, the framing was right. But the image did not live up to what you envision. Learn re-touching techniques that bring back the “alive” feeling, the mood, and all that inspired you when you committed to capture the image.

Her techniques remove the need for tedious selections and endless numbers of steps. These lessons are developed in such a way to save countless hours in front of your computer screen.  Janice will teach how to get the most out of your workflow, optimizing raw images, noise-reduction techniques, global adjustments vs. targeted adjustments, selective enhancements, bringing out detail, applying traditional techniques, black and white images from color capture and creating a style with your retouching.

RonmartBlog.com and Nik Software have teamed up to bring you this special webcast exclusively for Ron Martinsen Photography Blog readers. Ron’s been a big fan of Nik Software for years and was one of the first web sites to offer a 15% discount off Nik Software (coupon code RMARTINSEN), so he’s very excited to have all of his loyal readers get to know their Nik Software products during this presentation. If you haven’t purchased any Nik Software products yet, you’ll really enjoy seeing the cool things that Janice can do with Nik Software. You are certain to see why Ron loves these products so much and uses them on nearly every photo he edits!

Janice’s teaching technique is designed to energize and inspire you to see what is possible in the final steps of image preparation. Tools to be used include: Photoshop CS5 and the full suite of Nik Software products.

Sign Up Now

This session will take place on Monday, July 11, 2011 at 5:00 PM - 6:00 PM PDT. It is open to blog readers around the world. To register, simply click this link:

https://www2.gotomeeting.com/register/251190547

Nik Software Product Reviews

You can see Ron’s reviews on Nik Software products below:

To hear Nik Radio’s interview of Ron (9/23/10 episode #41), click here.

Special Offer

To get a discount just enter the code (see my discount coupon code page for updates if this doesn’t work):

Shopping cart code subject to change

If you did everything correctly you should see the correct price. My code also works for other versions – not just upgrades, so save on most Nik Software products when you use this code!

Prices subject to change without notice. I will get a commission and you’ll get a discount if you purchase using my code, so help us both by using the code!

NOTE: If any other codes are listed please choose REMOVE and enter mine as it’s the best deal you can get for this product!

Nik Software customers in Europe should contact europe@martinsen.com to get more on the discount.

Disclosure

Nik Software is a partner of this blog. If you make a purchase using my code, I may get a commission. Please support this blog by using my coupon code. This webinar is being presented at Ron’s request to Nik Software as a public service to his readers.

NOTE: This site requires cookies and uses affiliate linking to sites that use cookies.

If you enjoyed this article, please support future articles like this by making a donation or saving money by using my discount coupon codes. Either way, your support is greatly appreciated!

This blog is intended for freelance writing and sharing of opinions and is not a representative of any of the companies whose links are provided on this site.

The opinions provided are of Ron Martinsen alone and do not reflect the view of any other entity